


Simply change the way traditional data analysis and business intelligence development is handled by integrating ChatGPT into Power BI
It is also possible through this integration to obtain more effective reports related to making decisive and appropriate decisions
In order to get the desired benefit from using these features optimally, you must first develop your skills in Power BI, and this is done by integrating ChatGPT within your scope of work, and this is very simple, with a few clicks you can get results and find solutions more quickly and effectively
This is what we will explain in this article to get the required benefit from using this technology, which will also help you with DAX queries
Should we know why should we integrate ChatGPT into Bower BI?
The Power BI tool is one of the most important tools in data visualization and analysis, and this is what users of this tool feel in their dealings with data, but when dealing with large data sets, dealing with DAX queries becomes more difficult
But when ChatGPT is integrated into that system, it will become easier in terms of speed and accuracy in obtaining answers, and thus the pace of your work will increase and become more flexible, as ChatGPT contributes to the completion of many other tasks, such as finding glitches, working to restore them, calculating metrics, building complex calculations, and other tasks other
In going to how to integrate ChatGPT into Power BI we will call the API to interact with the ChatGPT API business functions and in conjunction with the use of the visual feature of Power BI
This is done by following these steps:
1. Subscribe to the OpenAI API key: You must first obtain an API key to access the ChatGPT API
2. Visit https://www.openai.com/api and register to get an API key
3. Building custom visualizations in Power BI: This is done using TypeScript and D3.js.
4. Prepare your own environment for custom visual development, you can use the guide on the link:
https://docs.microsoft.com/en-us/power-bi/developer/visuals/environment-setup
5. Create a new custom visual project: using the Bower BI command line
6. Open Terminal or Command Prompt and run:

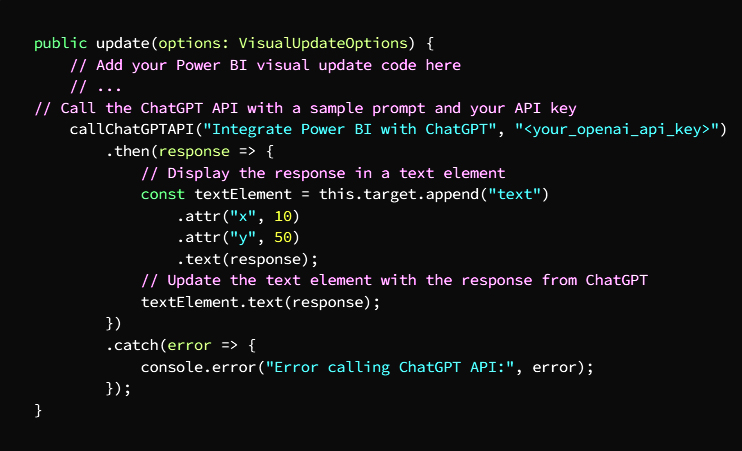
API call: In your new custom visual project, modify the src / visual.ts file to include the code necessary to make API calls to ChatGPT
To make HTTP requests you will need to use a library such as “axios” loaded by run
npm install axios
Then modify the src/visual.ts file by making the necessary imports as a ChatGPT API call

Call the API in the visual update function: by making modifications to the update task in the src/visual.ts file to call the ChatGPT API and show the results, eg using a text element to show the response from ChatGPT
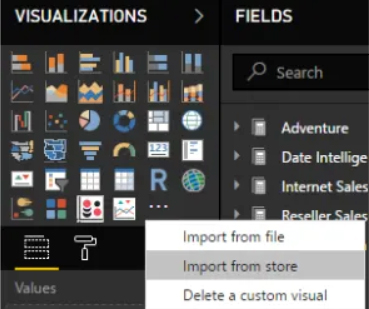
Importing custom visuals after compiling them: You have to package the visuals by running the pbiviz package in the terminal, right after completing the code, and this will create a .pbiviz file in the dist folder.
Going to Power BI, import the custom visualizations by selecting the ellipsis (…) in “Visualizations” section and click on the option (Import from file) and select the generated file which is .pbiviz

Add visuals to a Power BI report by selecting it from the “Visualizations” section
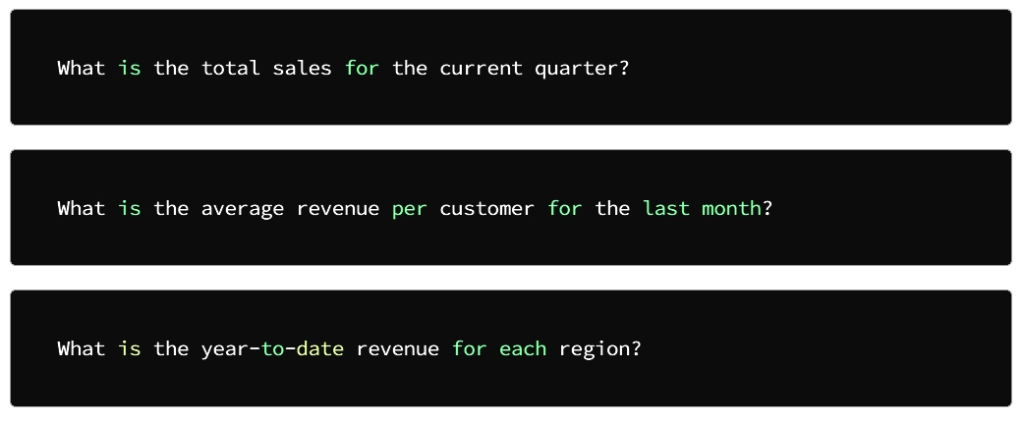
In the following example, we demonstrate how to query DAX by casting it to ChatGPT:

Now take a look at the DAX expression code from which you get the same result:

With Power BI integration, you’ll get instant answers that help speed up your workflow
This is what we will explain with examples of DAX queries that can be asked on ChatGPT:
Moreover, if you are caught by an error message, ChatGPT handles and fixes the bugs in the DAX expressions, and as we mentioned at the beginning of the article, one of the valuable tasks that ChatGPT helps you do is find and fix the bugs in the DAX expressions
ChatGPT helps save a lot of time and effort in dealing with huge data sets because you can use AI Chatbot visuals when creating complex DAX expressions instead of manually writing each calculation
My professional friends, this benefit is dedicated to you.. You deserve it
Now we’ll go over a very important topic of how to integrate ChatGPT with Power BI using Python
This is done by implementing the following steps:
Enable Python in Power BI Desktop
This is done by following these steps:
1. Install Python on your computer. If you do not have a copy of Python on your computer, you can get it from the official website: https://www.python.org/downloads/
2. Then you have to install the Python Compatibility feature in Power BI Desktop
3. Go to Power BI Desktop and follow the following path:
File -> Options and settings -> Options -> Python scripting
Then choose check for “Python scripting” box then choose “OK”
With this, you have achieved compatibility for Python scripting in Power BI Desktop
4. After completing the previous step, you will have to set the Python path in Power BI Desktop
5. Perform the following steps:
File -> Options and settings -> Options -> Python scripting
Click “Detect” to automatically detect the Python installation path instead of choosing it manually
6. After executing the previous step, restart Power BI Desktop for the new changes to take effect
Now you have to install the following Python libraries:
- Openai is the library that provides access to the ChatGPT model
- Pandas is the library that creates and manipulates dataframes
- Pyodbc is the library that secures the connection to a Power BI data source
You can install these libraries using pip by running the following command in terminal:

We are now at the stage of validating and setting up the OpenAI API
• Create an OpenAI account and own an API key
• Install the OpenAI Python library
• Set OPENAI_API_KEY to your API key
• By running the following Python code, you can authenticate and configure the OpenAI API

Define a task that queries the ChatGPT model and returns the response:

The query_chatgpt function takes a directive as input, sends it to the ChatGPT form, and then returns the response
Connect to a Power BI data source using pyodbc:

• Write a Power Query function that calls the query_chatgpt function, which returns the response in tabular form
• Deploy your Python script as a data farm in Power BI
• Go to Power BI Desktop and select the “Home” tab
• Click on ‘Transform Data’ and choose:
New Source -> Python Script
Go to Python script and click OK then Close & Apply
Use the ChatGPT data source in your own Power BI report
• Go to the Report tab
• Click on Get Data, then More
• Select the data source “Python Script” and click Connect
• Enter the subject to be sent to the ChatGPT form
• Finally, the response will appear as a table in the Power BI report Finally, be sure to enter the actual values for your environment rather than the elements in the code
ChatGPT + Power BI الذكاء الاصطناعي باستخدام

بكل بساطة يمكن تغير طريقة التعامل مع تحليل البيانات وتطوير أسلوب ذكاء الأعمال التقليديَّين وذلك بواسطة
Power BIفي ChatGPT دمج لغة
كما ويمكن من خلال ذلك الدمج الحصول على تقارير أكثر فاعلية تتعلق باتخاذ القرارات الحاسمة والمناسبة
ولتحصيل الفائدة المرجوة من استخدام هذه الميزات على الوجه الأمثل لابد في البداية
Power BI من تطوير مهاراتك في
ضمن نطاق عملك ChatGPT ويتم ذلك بدمج
ويتعبر ذلك أمراً بسيطاً للغاية فبعدة نقرات تستطيع تحصيل النتائج والعثور على الحلول بسرعة وفاعلية أكبر وهذا ما سنشرحه في مقالتنا هذه لتحصل على الفائدة المطلوبة من استخدام هذه التقنية والتي أيضاً
DAX ستساعدك في استعلامات
يجب أن نعرف لماذا يجب علينا
Bower BI في ChatGPT دمج
Power BI تعتبر أداة
من أهم الأدوات في تصور البيانات وتحليلها وهذا ما يلمسه مستخدمو هذه الأداة في تعاملاتهم مع البيانات، ولكن عند التعامل مع مجموعات البيانات الضخمة يصبح التعامل
أكثر صعوبة DAX مع استعلامات
ChatGPT ولكن عند دمج
في تلك المنظومة سيصبح الأمر أكثر سهولة من حيث سرعة ودقة الحصول على الإجابات وبالتالي ترتفع وتيرة عملك وتصبح أكثر مرونة
ChatGPT حيث أن
يسهم بإنجاز مهام أخرى كثيرة ومتنوعة كالعثور على مواطن الخلل والعمل على ترميمها وحساب المقاييس وبناء العمليات الحسابية المعقدة وغيرها من المهام الأخرى
وفي الانتقال إلى
Power BI في ChatGPT كيفية دمج
سنقوم باستدعاء واجهة برمجة التطبيقات لإجراء التفاعل مع وظائف عمل
ChatGPT واجهة برمجة تطبيقات
وبالتزامن مع استخدام الميزة
Bower BI المرئية لـ
: ويتم ذلك باتباع الخطوات التالية
: OpenAI API اشترك في مفتاح *
يجب أن تحصل أولاً على
API مفتاح
ChatGPT API للوصول إلى
: قم بزيارة الموقع *
API والتسجيل للحصول على مفتاح *
Power BI بناء مرئيات مخصصة في
D3.js. و TypeScript ويتم ذلك باستخدام
:تجهيز بيئة خاصة بك للتطوير المرئي المخصص، يمكنك الاستعانة بالدليل الموجود على الرابط *
https://docs.microsoft.com/en-us/power-bi/developer/visuals/environment-setup
: إنشاء مشروع مرئي جديد مخصص *
Bower BI وذلك بواسطة سطر أوامر
Terminal افتح *
: أو موجه الأوامر وقم بتشغيل

: API استدعاء
في مشروعك مرئي المخصص الجديد
src/visual.ts قم بتعديل ملف
لإدراج الكود الضروري للقيام بعملية
ChatGPT إلى API استدعاءات
HTTP ولإجراء طلبات
ستحتاج إلى الاستعانة
“axios” بمكتبة مثل
npm install axios حمله بواسطة تشغيل
ثم أجرِ تعديل
src/visual.ts على ملف
عن طريق إجراء عمليات الاستيراد اللازمة
ChatGPT API كاستدعاء

API قم باستدعاء
في وظيفة التحديث المرئي : وذلك بإجراء تعديلات مهمة التحديث
src/visual.ts في ملف
وإظهار النتائج ChatGPT API لاستدعاء
كأن تستخدم عنصر نص لإظهار الاستجابة
ChatGPT من

استيراد المرئيات المخصصة بعد تجميعها
عليك القيام بتعبئة المرئيات المرئية
pbiviz package بواسطة تشغيل
terminal في
وذلك بعد الانتهاء مباشرة من الكود وهذا سيؤدي إلى
.pbiviz وهذا سيؤدي إلى إنشاء ملف
dist. في مجلد
Power BI وبالانتقال إلى
قم باستيراد المرئيات المخصصة عن طريق اختيار
(…) علامة الحذف
“Visualizations” في التبويبة
(Import from file) وانقر على الخَيار
وحدد الملف الذي تم إنشاؤه
.pbiviz وهو
Power BI أضف العناصر المرئية إلى تقرير
بواسطة تحديده من
Visualizations قسم
وفي المثال التالي نوضح طريقة
ChatGPT بطرحه على DAX استعلام

DAX ألقِ نظرة الآن على كود تعبير
:من خلاله تحصل على نفس النتيجة

Power BI بالدمج في
ستحصل على إجابات فورية تساهم في تسريع وتيرة عملك
DAX وهذا ما سنوضحه بأمثله عن استعلامات
ChatGPT يمكن طرحها على

علاوة على ذلك، إذا فاجأتكَ رسالة خطأ
ChatGPT فيستولى
DAX معالجة الخلل وإصلاحه في تعبيرات
وكما أسلفنا في بداية المقال من المهام القيِّمة
ChatGPT التي يساعدك
في القيام بها هو العثور على الأخطاء
DAX وإصلاحها في تعبيرات
ChatGPT يساعد
في توفير الكثير من الوقت والجهد في التعامل مع مجموعات ضخمة من البيانات
“AI Chatbot” إذ يمكنك استخدام العناصر المرئية
DAX عند إنشاء تعبيرات
المعقدة بدلاً من كتابة كل عملية حسابية بشكل يدوي
أصدقائي المحترفين هذه الفائدة مخصصة لكم .. أنتم تستحقون
والآن سنتناول موضوع بالغ الأهمية
Power BI مع ChatGPT هو كيفية دمج
Python باستخدام
: ويتم ذلك بتنفيذ الخطوات الآتية

Power BI Desktop في Python تمكين
: ويتم ذلك باتباع الخطوات التالية
:تثبيت بايثون على جهاز الكمبيوتر الخاص بك، فإن لم تكن تمتلك نسخة بايثون على جهازك يمكنك الحصول عليه من الموقع الرسمي *
https://www.python.org/downloads/
Power BI Desktop ثم عليك تثبيت ميزة توافق بايثون في *
Power BI Desktop انتقل إلى *
:واتبع المسار التالي
File -> Options and settings -> Options -> Python scripting
“Python scripting” ثم اختيار تحديد للمربع
“ثم اختر “موافق
وبهذا تكون قد أكملت التمكين للبرمجة النصية لبايثون
Power BI Desktop في
بعد الانتهاء من الخطوة السابقة يبقى أمامك تعيين *
Power BI Desktop مسار بايثون في
:قم بتنفيذ الخطوات التالية *
File -> Options and settings -> Options -> Python scripting
“Detect” انقر فوق
لاكتشاف مسار تثبيت بايثون تلقائياً بدلاً من اختياره يدوياً
بعد تنفيذ الخطوة السابقة
Power BI Desktop أعد تشغيل
لتصبح التغيرات الجديدة سارية المفعول
: الآن عليك تثبيت مكتبات بايثون التالية
Openai
وهي المكتبة التي تؤمن الوصول
ChatGPT إلى نموذج
Pandas
وهي المكتبة التي تنشئ إطارات البيانات ومعالجتها
Pyodbc
وهي المكتبة تؤمن الاتصال
Power BIبمصدر بيانات
pip وهذه المكتبات يمكنك تثبيتها باستخدام
terminal بواسطة تشغيل الأمر التالي في

OpenAI API وصلنا الآن مرحلة المصادقة وإعداد
OpenAI أنشئ حساب على موقع *
API وامتلك مفتاح
OpenAI Python ثبِّت مكتبة *
OPENAI_API_KEY قم بتعيين *
الخاص بك API لمفتاح
وعن طريق تشغيل كود بايثون التالي تتمكن *
OpenAI API من مصادقة وإعداد

ChatGPT حدد مهمة تستعلم عن نموذج
: وترجع الاستجابة

موجهًا كمدخلات query_chatgpt تأخذ الدالة
ChatGPT وتقوم بإرسالها إلى نموذج
ثم ترجع الاستجابة
Power BI الاتصال بمصدر بيانات
pyodbc باستخدام

Power Query اكتب دالة *
query_chatgpt التي تستدعي الدالة
والتي ترجع الاستجابة على شكل جدول
انشر السكريبت الخاص ببايثون *
Power BI كمصر بيانات في
Power BI Desktop انتقل إلى *
” Home” واختر علامة التبويب
:ثم اختر ‘Transform Data’ انقر فوق *
New Source -> Python Script
OK واضغط Python script ادخل على
Close & Apply ثم
ChatGPT استخدم مصدر بيانات
Power BI في تقريرك الخاص على
Report اذهب إلى علامة التبويب *
More ثم Get Data انقر على *
“Python Script” اختر مصدر البيانات *
Connect وانقر على
ChatGPT أدخِل الموضوع المراد إرساله إلى نموذج *
أخيراً تأكد من إدخال القيم الفعلية لبيئتك بدل العناصر الموجودة في الكود
